These instructions will help you configure a Crypto Setting for the Bitstamp Exchange.
1. Login to your account at: https://www.bitstamp.net
2. Create your API keys on the Bitstamp website.
Find your "username" for CAS:
Navigate to: https://www.bitstamp.net/account/balance/

Navigate to the "API Access" screen at: https://www.bitstamp.net/account/security/api
Select all boxes, enter your 2FA, then "GENERATE KEY":

Save the generated API Key & Secret Key, and request activation:

Wait for the activation email from Bitstamp, then activate the key.

After the email verification is finished, the key will be active:

3. Finally, enter the required parameters into CAS:
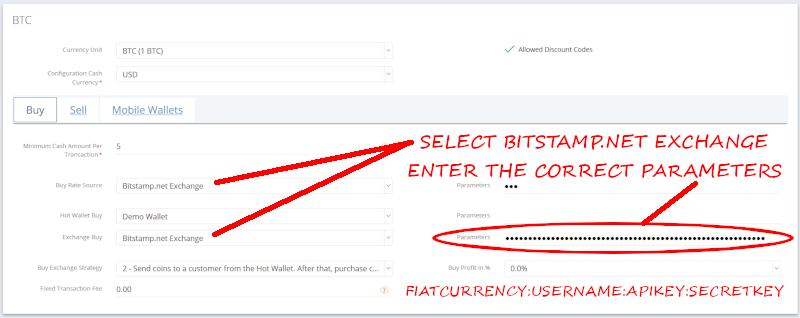
Select Bitstamp.net Exchange
Parameters: fiatcurrency : username : apikey : secretkey
fiatcurrency may be "USD" or "EUR".
username was determined in step 2 above.
apikey and secretkey were determined in step 2 above.
In this example, using the above, our "Parameters" looks like this:
USD:073658:Petanz7pjEFBqAdGZEeii5OdOc9PDIkP:zJqe9Ud9n8gWL42a3gDV1R85vbJhAfHi
4. Save the Crypto Setting!

5. Test what you just saved.

If the "Exchange Buy" test is successful, you've configured the Bitstamp.net Exchange properly!