| Tip |
|---|
This guide is designed to help you connect your CAS to a working BitGo Express server. |
This article presumes you have a functioning Bitgo Express node server.
If you do not
have
a server setup, or are uncertain, please see:
BitGo Express is designed, created, and written supported by BitGo for their BitGo website wallet.
This 2024 article is intended to help you find the necessary CAS parameters from your Bitgo account and their Bitgo Express software.
| Info |
|---|
BitGo holds and secures your cryptocurrency keys. BitGo Wallet is a hot wallet option in the Crypto Application Server (CAS). BitGo Express is used to interface with BitGo. CAS does not interact with BitGo directly. |
1
.) Assemble your BitGo Express parameters for CAS
:.
Parameters are required: host : port : token : wallet_id : wallet_passphrase
Your actual host & port will be reported by BitGo Express:
port: 3080 is the default port, and is used in most every case & examples below.
Other parameters may be offered, but are not absolutely required. We suggest you get your Crypto Setting working properly, before adjusting those optional parameters.
a) host:port
The host:port parameters identify the location (on the Internet) of your Bitgo Express server. You must operate a Bitgo Express server to use a Bitgo-based Crypto Setting.
“host”:
The
“host”host is where CAS will steer RPC communications: the target Bitgo Express server. The server will vary upon your implementation, and the IP
will vary depending upon your actual assigned IP for your serveraddress will always be different from the provided example.
host
a) using a SSH tunnel, or
b) Bitgo Express is running on the same server as CAS (not recommended).
is the target BitGo Express server IP when using the GB Wallet Tunnel,
e.g. “http://123.
012”
The GB Wallet Tunnel will attempt to connect to your BitGo Express server at that IP.
2. Prepare your developer API token at BitGo.
To create a new access token:
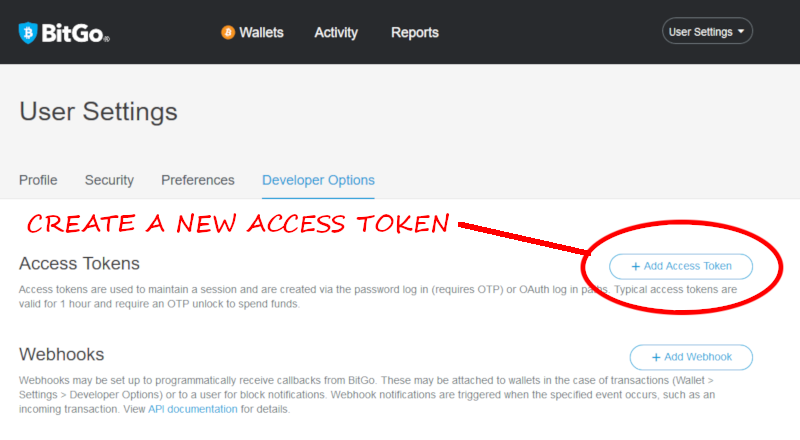
Navigate to: https://www.bitgo.com/settings#developerOptions
Click + Add Access Token
Use http://localhost when:
a) using an (unsupported) SSH tunnel, or
b) Bitgo Express is running on the same server as CAS (not recommended).
“port”:
3080 is the default port, and is used in most every case & all examples below.
b) token
API tokens are generated by you (the Bitgo user) on demand, here’s how:
I) Login to your Bitgo account.
II) Navigate to your Enterprise settings.
III) Click +Create Access Token.
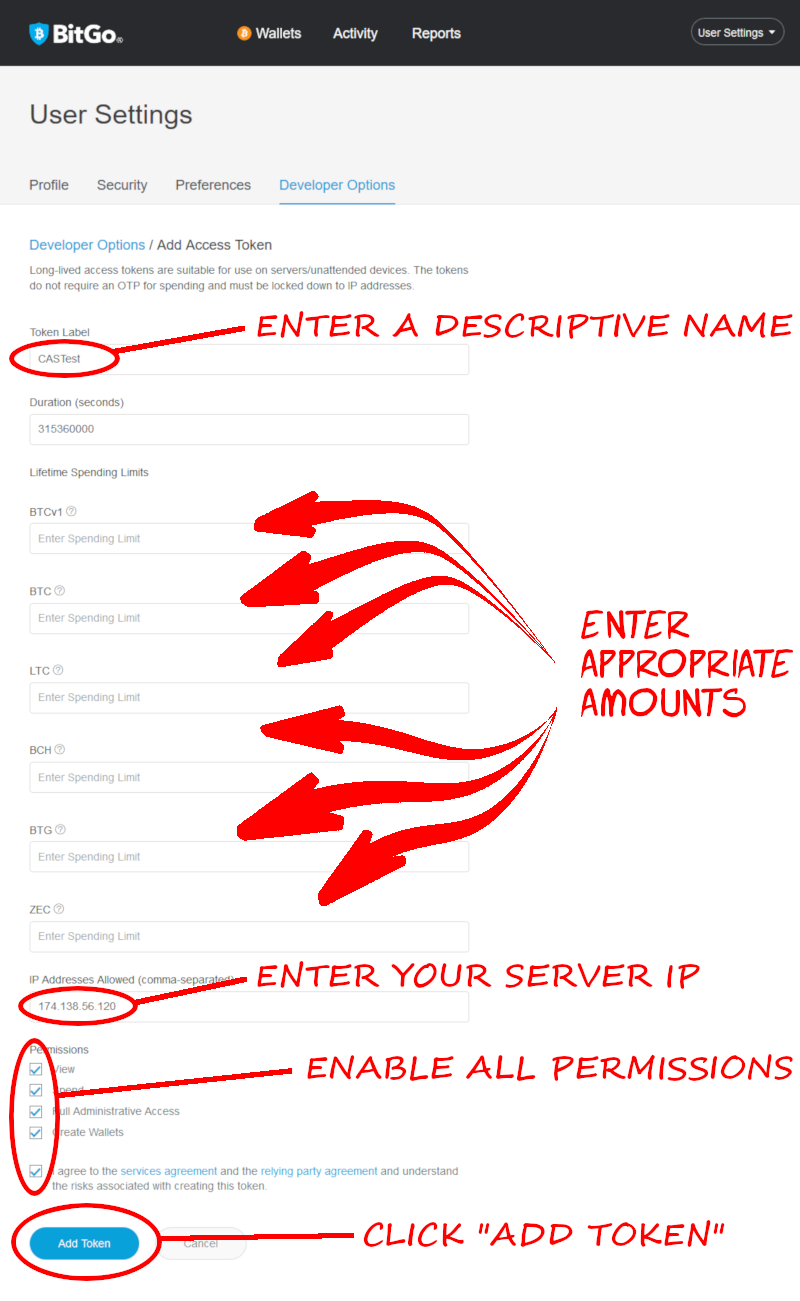
IV) Configure the new access token’s settings and permissions.
Enter a descriptive name for the API token.
“Spending Limits” should be non-zero. Enter appropriate amounts.
Enter your BitGo Express node server IP.
Enable all permissions by checking all boxes.
Agree to the terms, and click "Add Token".
Set a reasonable expiration date. The default is 1 week - which is far too short for production use. Increase the expiration to a year (or more), and always delete unused tokens.
Enable all permissions for testing. Upon success, you can then play with increased restrictions.
Enter the IP address of your Bitgo Express node.
Read the agreements, and check “I agree” when it is honest.
Enter your 2FA code (after everything else has been entered).
And finally: create the token.
Note: Spending Limits” can be zero, but you should put in some limit to comply with “best practices”.
See: https://generalbytes.atlassian.net/wiki/spaces/ESD/pages/2893283329/Best+Practices%3A+Security
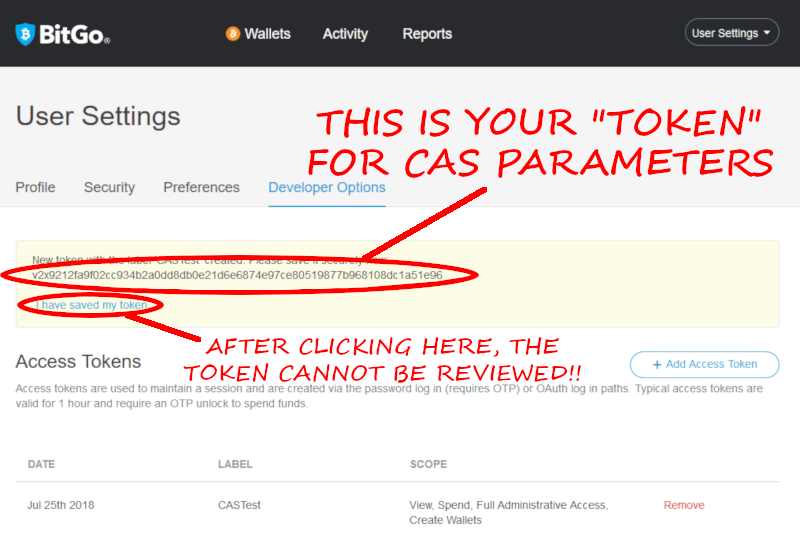
The next screen reveals your developer API token. Save it!
It cannot be displayed again!
The token generated is the “token” parameter required in your Crypto Settings.
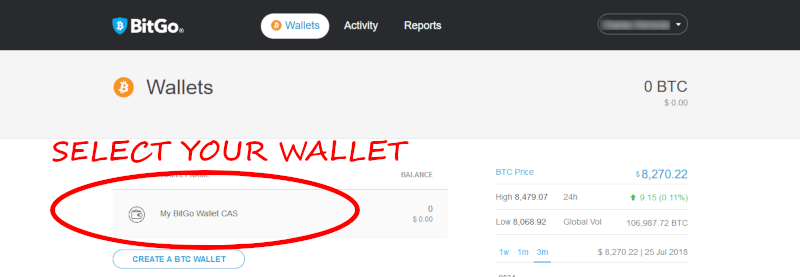
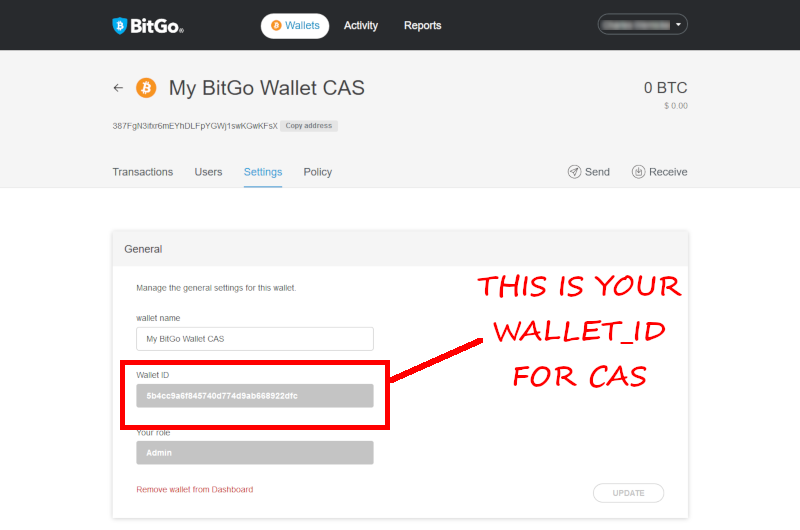
c) wallet_id
The wallet_id
in your BitGo wallet settings:Determine your wallet_passphrase.parameter is located in the relevant wallet settings. Start at “Assets”.
Click on the asset/wallet whose ID you seek to identify.
Drill down further into the coin/asset/wallet that you wish to use.
Locate that Wallet ID in Settings.
Save it.
d) wallet_passphrase
Normally this is your account password (by default) -unless- you created a new wallet and chose a separate password (which is recommended).
3.In that case, the wallet_passphrase is set on the same page as the Wallet ID.
If you haven’t set a specific wallet password, use your account password.
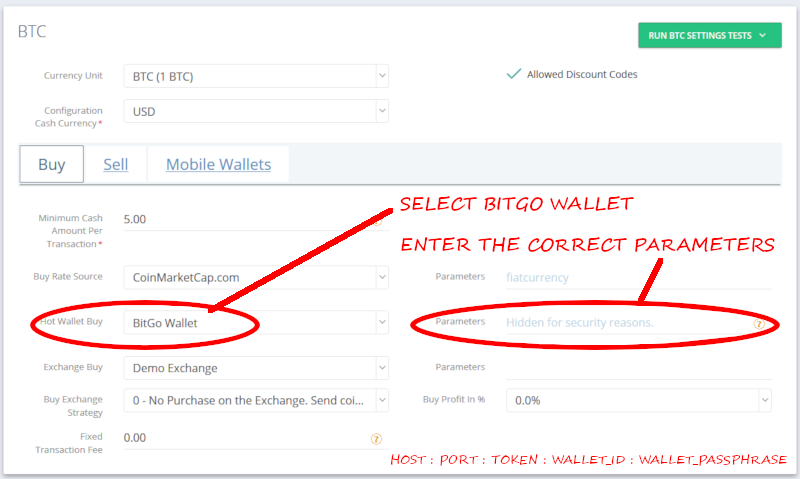
2) Enter the assembled parameters into CAS
:.
Initially, set only the required parameters (shown). After a successful test, you should insert any additional/optional parameters that you feel are useful.
a) Select BitGo Wallet
b) Parameters:
host : port : token : wallet_id : wallet_passphrase : num_blocks : fee_rate : max_fee_rate
host is explained towards the top of this article: Understanding “host”.
port is explained towards the top of this article: Understanding “host”.
token is from: Create a new access token (above) https://generalbytes.atlassian.net/wiki/spaces/ESD/pages/edit-v2/1001848911#%E2%80%9Chost%E2%80%9D%3A
port normally 3080, but see: https://generalbytes.atlassian.net/wiki/spaces/ESD/pages/edit-v2/1001848911#%E2%80%9Cport%E2%80%9D%3A
token is from: https://generalbytes.atlassian.net/wiki/spaces/ESD/pages/1001848911/BitGo+Express+Parameters#b)-token
wallet_id is from: Locate your : https://generalbytes.atlassian.net/wiki/spaces/ESD/pages/1001848911/BitGo+Express+Parameters#c)-wallet_id (above)
wallet_passphrase is from: Determine your https://generalbytes.atlassian.net/wiki/spaces/ESD/pages/1001848911/BitGo+Express+Parameters#d)-wallet_passphrase (above)
num_blocks (optional, default=2) (BTC only): the targeted number of blocks for confirmation. The lower the number, the higher the mining fees (but confirmation is faster).
See: this Bitgo article.
fee_rate (optional): the MINIMUM amount in the basic units of the given cryptocurrency.
e.g. Bitcoin: “satoshis per kvByte” (minimum: 1000), must be less than max_fee_rate.
max_fee_rate (optional): the MAXIMUM amount in the basic units of the given cryptocurrency.
e.g. Bitcoin: “satoshis per kvByte” (minimum: 1000).
In this example, using the aboverequired parameters only, our "Parameters" looks like this (all one line, no spaces):
| Code Block |
|---|
http://localhost123.456.789.012:3080:v2x922bc21177ad708ebbce21fbd7bb4faba5e5f71d7364a901ac6387bd18402aa4:5b58f06d239b32e506435b664b72945d:b788PqEE8cwtFP8nsJTd |
When entering a parameter string, the string must be completely entered every time.
i.e. you cannot just replace the “host” or “token” values without entering the other values as well.
3) Enable the GB Wallet Tunnel and enter the tunnel password:
The BE (Bitgo Express) node should always be on a dedicated & separate server.
The GB Wallet Tunnel offers a nativeopen source, secure SSH tunnel connection to the BE node.
Leave it this disabled if you use, understand, and deploy manage your own alternate form of SSH tunnel.
5.
4) Save the Crypto Setting!
6.
5) Reload the Crypto Setting, and test what you just saved.
| Note |
|---|
NOTEETHEREUM:You must have an INSTITUTIONAL account with Bitgo to send or receive ETH (or any ETH derivatives), including USDT ERC-20.
|
| Note |
|---|
TRX/TRONUSDT TRC-20 will require a TRON (TRX) wallet on Bitgo. After the TRON wallet is created (and funded with 100 TRX), you can send USDT to that same address (and send USDT to customers).
|
Troubleshooting Tips:
The Hot Wallet BUY test validates your Hot Wallet parameters (only).
The other Crypto Setting tests (Exchange, Rate Source, etc) are irrelevant in this scope.
The master log will contain more specific and relevant entries data regarding any failures.
Have you set “Spending Limits” for your authorization token?
Spending Limits are may be set when creating the access token at Bitgo. A non-zero amount must be listed for each desired coin. If the amount is left as zero, the Crypto Test will pass, while the live transaction will fail.
A “best practice” is to set the limit to a reasonable minimumlimit. See: https://generalbytes.atlassian.net/l/cp/Xv9ihqgM
Create You must create a new access token at Bitgo (and re-enter the parameters) if you experience this issue.
Is your tunnel working?
You’ll see this in the log if the tunnel is connecting correctly:
DEBUG com.generalbytes.batm.server.e.b - opening new tunnel on port 22222, remoteWalletAddress: xxx.xxx.xxx.xxx:3080DEBUG com.generalbytes.batm.server.e.b - tunnel connected: ClientSessionImpl[batmsshtunnel@yyy.yyy.yyy.yyy/yyy.yyy.yyy.yyy:22222] 42087->3080
this indicates a secure connection is active between CAS (yyy.yyy.yyy.yyy) and your BitGo Node (xxx.xxx.xxx.xxx). If you don’t see “connected”, then please double-check your tunnel password.
The wallet tunnel is critical for success. Here are some troubleshooting steps:
Alternative (unsupported): SSH Tunneling
Have you whitelisted your BitGo Express node in your BitGo API keys?
See the instructions above: https://generalbytes.atlassian.net/wiki/spaces/ESD/pages/1001848911/BitGo+Express#2Express+Parameters#2.-Prepare-your-developer-API-token-at-BitGo.
BitGo must permit your BitGo Express node to connect to it’s network, and that is partly controlled by the IP whitelist set by your account when creating the API token.
A standard (free) Bitgo account permits
transactions with onlythese coins (as of Nov 2022):
| Code Block |
|---|
Bitcoin (BTC)
Ripple (XRP)
Bitcoin Cash (BCH)
Litecoin (LTC)
Stellar (XLM)
Eos (EOS)
Tron (TRX)
Dash (DASH)
ZCash (ZEC)
Algorand (ALGO)
Mainnet Hedera HBAR (HBAR)
Bitcoin Gold (BTG)
Casper (CSPR)
Polkadot (DOT)
Stacks (STX)
Solana (SOL)
Near (NEAR)
USDT:TRX (BUY transactions only) |
Currently, these are the additional coins that a Bitgo ENTERPRISE institutional account allows:
| Code Block |
|---|
Ethereum (ETH) Ethereum Classic (ETC) Celo Gold (CELO) Bitcoin SV (BSV) Avalanche C-Chain (AVAXC) Rootstock RSK (RBTC) Stacks (STX) Polygon (POLYGON) USDT:ETH (All transaction types) USDT:TRX (SELL transactions in addition to BUY) |


