

The Lightning Network can be used with any node software that supports SegWit. In this example, we'll demonstrate the steps to install Lightning with Bitcoin Core. This guide is intended to merely demonstrate specific commands for using this node with CAS.
| Warning |
|---|
STOP - if you need an introduction to Lightning. Please learn the intricacies & nuances of the Lightning network at introductory sites such as: https://bitcoiner.guide/lightning/ |
This article is not intended to describe usage of the Lightning Network or transmission/receipt of payments.
This article implements LND v0.13.1.
1) Setup a Bitcoin Core node (as illustrated here).
2) Open the Bitcoin Core config file for editing (default shown):
| Code Block |
|---|
sudo nano "$HOME/.bitcoin/bitcoin.conf" |
The bitcoin.conf may exist in several places, but only one will be active. You’ll need to determine which one is active to edit the correct file. Search for all config files first:
find / -name bitcoin.conf -print 2>/dev/null
The proper config file will also have a wallet file in the same directory:
find / -name wallet.dat -print 2>/dev/null
Note your rpcuser & rpcpass located in the config file for later use (below).
3) Add these additional settings to the config file:
| Code Block |
|---|
addresstype=p2sh-segwit txindex=1 # Block and Transaction Broadcasting with ZeroMQ zmqpubrawblock=tcp://127.0.0.1:29000 zmqpubrawtx=tcp://127.0.0.1:29001 |
Save & exit nano (Ctrl-X).
4) Restart Bitcoin Core to load the new settings.
5) Download the LND pre-compiled tarball:
| Info |
|---|
Like Bitcoin, Lightning is currently “beta” software. There is no other type (at this time). Don’t be alarmed by the “beta” tag in the filename. |
| Code Block |
|---|
latest=$(curl -Ls -o /dev/null -w %{url_effective} https://github.com/lightningnetwork/lnd/releases/latest)
lnversion=${latest##*/}
wget "https://github.com/lightningnetwork/lnd/releases/download/$lnversion/lnd-linux-amd64-$lnversion.tar.gz" |
6) Verify the file integrity (optional but recommended):
| Code Block |
|---|
shasum -a 256 "lnd-linux-amd64-$lnversion.tar.gz" |
This checksum will vary between versions. Verify the checksum from
The checksum hash for: lnd-linux-amd64-v0.13.1-beta.tar.gz should be:
| Code Block |
|---|
33bd43d9a8938e0278f0953a29f5d5749864d864d01dd6bd888db60ccb6705f5 |
If the two don't match, STOP. Something is wrong; check that you’ve downloaded the same file, and verify from the lnd GitHub site that the hash is correct.
7) Extract the program to the system path.
| Note |
|---|
WARNING: This will overwrite any existing version! |
| Code Block |
|---|
sudo tar -C /usr/local/bin --strip-components=1 -xzf "lnd-linux-amd64-$lnversion.tar.gz" |
8) Configure LND:
Create the default LND directory:
| Code Block |
|---|
mkdir ~/.lnd |
Create and secure the LND configuration file:
| Code Block |
|---|
touch ~/.lnd/lnd.conf chmod 0600 ~/.lnd/lnd.conf |
Open the configuration file for modification:
| Code Block |
|---|
nano ~/.lnd/lnd.conf |
Add these entries to the lnd.conf file:
| Code Block |
|---|
[Application Options] maxpendingchannels=10 restlisten=0.0.0.0:8088 alias=gbdemo-lnd color=#C413D1 [Bitcoin] bitcoin.active=1 bitcoin.mainnet=1 bitcoin.node=bitcoind [Bitcoind] bitcoind.rpcuser=[put your bitcoind RPC user name here] bitcoind.rpcpass=[put your bitcoind RPC password here] bitcoind.zmqpubrawblock=tcp://127.0.0.1:29000 bitcoind.zmqpubrawtx=tcp://127.0.0.1:29001 |
Add the correct credentials for
bitcoind.rpcuserandbitcoind.rpcpass(determined during your Bitcoin Core installation). LND uses the RPC credentials to communicate with Bitcoin Core.Note: the “restlisten” port is an important CAS parameter, and can be changed (as needed) to avoid conflicts with other services that may be running on your node server.
Save & exit nano (Ctrl-X).
Start the node.
| Code Block |
|---|
lnd |
The node will pause & protest that that the wallet is locked. You’ll need to create one (next).
If you already have a LN wallet, open the wallet (when requested) and skip the next step.
Create a new LN wallet.
Open another terminal window. The node (lnd) must continue to run in the background. The screen utility (or tmux) is perfect for this, or you may use 2 separate terminal windows - either way will work.
| Code Block |
|---|
lncli create |

Enter a new password. You’ll need this password every time you start the node, so make it memorable.
The Lightning node will now begin synchronizing. It won’t take very long, and it depends upon the underlying Bitcoin node. Both nodes must operate simultaneously.
You’ll need to unlock the wallet every time you start/restart the Lightning node.
Create a new deposit address.
A deposit address is required to add BTC to fund your LN wallet. You may create as many deposit addresses as you like; they all fund the same LN node.
| Code Block |
|---|
lncli newaddress p2wkh |
Creates a “Pay to witness key hash”, to which you’ll send Bitcoin to fund a channel (put BTC in escrow).

| Info |
|---|
A Lightning Channel is a type of temporary ledger that commits a certain amount of Bitcoin to all the contained, aggregate transactions. Think of it as a deposit, an amount that’s held in escrow until the channel is closed. When the channel closes, the tallies are committed to the Bitcoin blockchain (resulting in a finalizing transaction with normal BTC mining fees). |
Fund the new wallet.
Use: lncli channelbalance to view any existing balances already committed to a channel.
If you have not yet funded your wallet, send a small amount of Bitcoin to the address created in the previous step. The minimum amount is 0.0002 BTC (= 20,000 Satoshis).
Wait for the requisite confirmations (normally 3), then check your funding wallet balance:
| Code Block |
|---|
lncli walletbalance |
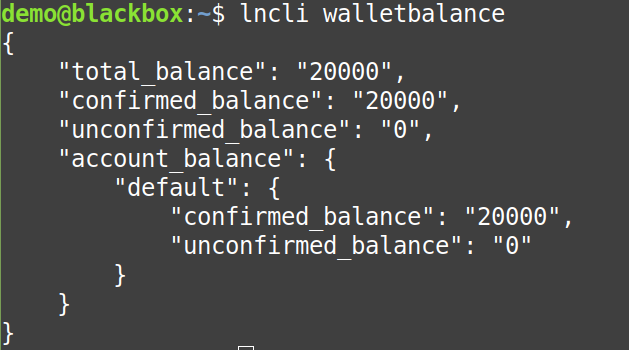
in this example, I’ve sent 20000 Satoshis to my funding wallet.
Create (open) a Payment Channel.
Some helpful advice: https://github.com/openoms/lightning-node-management
You must open a channel to someone else on the Lightning network. It doesn’t really matter who it is, but it should be a channel that fits your specific needs.
| Code Block |
|---|
lncli listchannels |

shows that NO channels are currently open. You can’t send any LN on the network, until you connect a channel to another node, so pick a channel from any suitable explorer.
| Info |
|---|
Some popular Lightning Channel Explorers: |
| Tip |
|---|
In this example, I’ll use the Lightning node listed by General Bytes:
|
We’ll use this info (from the Lightning explorer website) to extract 2 required channel details.
public key =
03e35a27fa8bfad8675aeb9e96530e7b00e6fa03b571d235f6b4e68cfb4ef9097cnode address =
67.207.92.63:9736
The final required piece is the amount. You’ll have to commit a certain amount to the initial transaction, and this will be locked up (you can’t spend the Bitcoin) until the final transaction is broadcast. If you commit 20,000 Satoshis to the channel, then that is the maximum amount you can send back & forth. Normally, you’ll commit the largest expected transaction amounts (in Satoshis) to the channel.
| Info |
|---|
The minimum amount required to open a channel is 20,000 Satoshis (.0002 BTC).
|
In this example, we’ll commit the trivial amount of 20000 Satoshis. This is the resulting command:
| Code Block |
|---|
lncli openchannel --node_key 03e35a27fa8bfad8675aeb9e96530e7b00e6fa03b571d235f6b4e68cfb4ef9097c --connect 67.207.92.63:9736 --local_amt 20000 |
| Note |
|---|
A very important concept to understand here is that the channel is composed of 2 Bitcoin transactions: an opening transaction (funding) and a closing transaction. The Bitcoin doesn’t “settle up” in the final transaction until the Lightning Channel is closed. There are a number of ways this may happen, some deliberate - some not - but it must be closed to release your BTC funding tx. It will be tied up in the channel until that event. When the channel is closed, it may take up to 2 weeks before the final transaction is posted! |
If successful, the request will return the funding transaction ID:

At any time, check your channel state using the lncli listchannels command demonstrated (above). It will take a certain amount of time to open the channel, but once it confirms (and activates), you’ll see an active channel as shown here, using:
| Code Block |
|---|
lncli listchannels |

no channels listed probably means the channel is still pending. It may take hours+ to confirm.
use
lncli pendingchannelsto examine the situation (and other channels that might also be in limbo - such as closed channels).
The channel will also automatically deduct the closing transaction’s mining fees from your deposit.
e.g. while 20,000 satoshis were deposited, only the
local_balance(19,273 satoshis) were available for spending. The current estimated mining fees (727 satoshis) for the closing transaction - are withheld.
| Info |
|---|
Until a channel is fully opened, you cannot use your node for transactions! |
| Tip |
|---|
Your Lightning node is now up & running.
|
Setup a secure tunnel for encrypted communication:
The GB Wallet Tunnel is recommended:
General Bytes has incorporated an open-source ssh client into CAS.
| Tip |
|---|
Install the GB Wallet Tunnel Server (instructions)
|
Alternate method (EXPERTS ONLY):
NOTE: to create a secure SSH tunnel between your CAS server and your node, use:
ssh -f -N -i /path/to/your/key -l <LOGIN_ID> -L 29001:127.0.0.1:29001 <NODE_IP>
This method is unusable with the GB Cloud, and provided for informational purposes only for those Operators with a Standalone CAS.
Prepare the parameters for the CAS Crypto Setting
In a text file, on a single line, assemble these parameters. Each parameter is separated by only a single colon (no spaces). This example uses spaces only for clarity of view (don’t use spaces)!
| Info |
|---|
The Parameter string includes 2 required pieces, and one optional: url : macaroon : cert |
Here’s a simple procedure to assemble the parameters:
| Code Block |
|---|
url="https://$( wget -qO - icanhazip.com ):$( cat ~/.lnd/lnd.conf | grep 'restlisten=' | cut -f2 -d':' )" macaroon=$( xxd -ps -u -c10000 ~/.lnd/data/chain/bitcoin/mainnet/admin.macaroon ) cert=$( xxd -ps -u -c10000 ~/.lnd/tls.cert ) echo -e "Your assembled CAS parameter string:\n$url:$macaroon:$cert" |
Here’s the gory details - in the event you want those instead.
1. url
The first parameter is the URL, and it depends upon your implementation.
Common between both implementations is the “restlisten=” port you set in the ~/.lnd/lnd.conf file (step 8 way at the beginning). The example supplied port “8088”, so if you haven’t deviated from the examples, then we know it’s “8088”. To be certain, you may execute this:
| Code Block |
|---|
cat ~/.lnd/lnd.conf | grep "restlisten=" | cut -f2 -d':' |
If the result is empty, STOP. You better restart from the beginning.
Whatever number is returned is the port you’ll need to append to the URL.
The URL will be https://127.0.0.1 if you used the “EXPERTS ONLY” option in the previous step, otherwise the URL will include the public IP of your node server. So, if your public IP is “123.123.123.123”, then the URL will be: https://123.123.123.123
Finally, append the port to the URL:
| Code Block |
|---|
https://123.123.123.123:8088 |
2. macaroon:cert
The contents of these 2 files must be converted & entered as hex in the CAS parameters:
~/.lnd/tls.cert
~/.lnd/data/chain/bitcoin/mainnet/admin.macaroon
Here’s the 2 discrete lines to accomplish this:
| Code Block |
|---|
xxd -ps -u -c10000 ~/.lnd/data/chain/bitcoin/mainnet/admin.macaroon xxd -ps -u -c10000 ~/.lnd/tls.cert |

Separate these with colons, and append to the parameter string (which already has the url):
| Code Block |
|---|
https://123.123.123.123:8088:0201036C6E6402F801030A10F4E593E228A73119BCD52FCCAC68D6B71201301A160A0761646472657373120472656164120577726974651A130A04696E666F120472656164120577726974651A170A08696E766F69636573120472656164120577726974651A210A086D616361726F6F6E120867656E6572617465120472656164120577726974651A160A076D657373616765120472656164120577726974651A170A086F6666636861696E120472656164120577726974651A160A076F6E636861696E120472656164120577726974651A140A057065657273120472656164120577726974651A180A067369676E6572120867656E657261746512047265616400000620DB23D44E6B093EBDA381B7DDF706D74FC95CAF57591861639102DF98F9A8143A:2D2D2D2D2D424547494E2043455254494649434154452D2D2D2D2D0A4D4949434B7A4343416447674177494241674952414B37706E43587132384F53426E7839416F4B4C65455977436759494B6F5A497A6A3045417749774E4445660A4D4230474131554543684D576247356B494746316447396E5A57356C636D46305A57516759325679644445524D4138474131554541784D49596D7868593274690A623367774868634E4D6A45774F4445344D6A45794D6A51795768634E4D6A49784D44457A4D6A45794D6A5179576A41304D523877485159445651514B45785A730A626D5167595856306232646C626D56795958526C5A43426A5A584A304D5245774477594456515144457768696247466A61324A766544425A4D424D47427971470A534D34394167454743437147534D343941774548413049414244594130456175316E572F30794B6F7050684F77394E7838653038576A61515771394D596B57790A514759486235574D2B7A2B36426D6E59447643484A662B496643362B7842435A704739756153393675426D364941436A67634D776763417744675944565230500A4151482F4241514441674B6B4D424D47413155644A51514D4D416F47434373474151554642774D424D41384741315564457745422F7751464D414D42416638770A485159445652304F42425945464F3743484939364F73796E2F636569664E6964546A68614B6174674D476B4741315564455152694D47434343474A7359574E720A596D393467676C7362324E6862476876633353434248567561586943436E56756158687759574E725A58534342324A315A6D4E76626D364842483841414147480A454141414141414141414141414141414141414141414748424D436F2F6D4F484550364141414141414141414773424E2F2F343978703477436759494B6F5A490A7A6A30454177494453414177525149674C686E787269395775744876485536456859626E42337434594C6E4E5A713544714B665A36584F4F6E356B43495144320A4B446963706457776F7073737277766C355968634A45425A525631344D46764238422B76335A6B744B673D3D0A2D2D2D2D2D454E442043455254494649434154452D2D2D2D2D0A |
Configure CAS.
Create (or modify) a Crypto Setting for use with your lnd node.
Select “lnd” as your “Hot Wallet Buy” provider, and
enter the parameters (assembled above).
If implemented (highly recommended) enable the Wallet Tunnel and enter the password.

Save it!

Test it.

Green means “go”.

Now you know that CAS is communicating with your Lightning node, it’s time for final leg - if you operate your own Standalone CAS.
| Tip |
|---|
GB Cloud customers: you are done! The next section does not apply to you. |
LNURL - for Standalone CAS Operators (only)
The next step is to enable Lightning wallets to interact with your CAS. Lightning is different from other coins; it will ask for the wallet address after inserting the fiat. CAS will communicate with your node and your customer’s wallet in separate channels while creating this transaction.
A Lightning BUY will request the Lightning QR code after the cash is inserted.
Expose the LNURL on your CAS server:
| Tip |
|---|
Open inbound port 7743 to all traffic. |
After implementing LN in Crypto Settings, a new HTTPS REST service will begin listening on:
hostnameis the BATM Master server IP address (or FQDN).
This endpoint must be publicly accessible from the Internet. The User’s wallet app will connect to it directly when your customer scans their LNURL QR code.
Port 7743 needs to be open to: /extensions/lnurl/withdraw, /extensions/lnurl/withdraw-confirm
Create the lnurl configuration file.
This file enables LNURL withdrawals (for BUY transactions). If you use the GB Cloud CAS, then this
Determine your public CAS IP: https://generalbytes.atlassian.net/l/c/UNMvKuz1
Create the
/batm/config/lnurlfile:Code Block sudo nano /batm/config/lnurl
Add this single line to the file:
| Code Block |
|---|
base_url=https://1.2.3.4:7743/extensions/lnurl |
Replace
1.2.3.4with your publicly accessible CAS IP address (or hostname). The object is that when accessed in a web browser, the URL should connect & display:BATM LNURL REST ServiceThe URL must support & specify HTTPS URL
The URL should have no trailing “/”.
Save the file (Ctrl+X).
Additional resources:
https://github.com/lightningnetwork/lnd/blob/master/docs/INSTALL.md
https://github.com/alexbosworth/run-lnd
https://docs.lightning.engineering/lightning-network-tools/lnd/wallet
https://docs.lnpay.co/api/lnurl-withdraw/how-does-lnurl-withdraw-work