Joke-coin or not, DOGE has become the focus of a great deal of attention recently. Your customers want it, here’s how to setup a node to provide it.
The following guide is written with instructions to be executed as a sudo-user. You will be a target for hackers, and your DOGE will be at risk. You are strongly encouraged to implement any and all restrictions available to you to protect your server from unauthorized access. These enhancements however, are beyond the scope of this guide, and entirely up to you.
Before you begin:
The following example is based on the following specs:
Ubuntu 20.04 LTS x86_64 environment
2 GB of memory (RAM)
10 GB hard drive space PLUS the blockchain size (this example = 70 GB)
The DOGE blockchain grows by about 10GB per year, so you should provide enough space to accommodate that eventual growth.
Find the current blockchain size here: https://bitinfocharts.com/dogecoin/
Download and install the software:
Start at the terminal prompt.
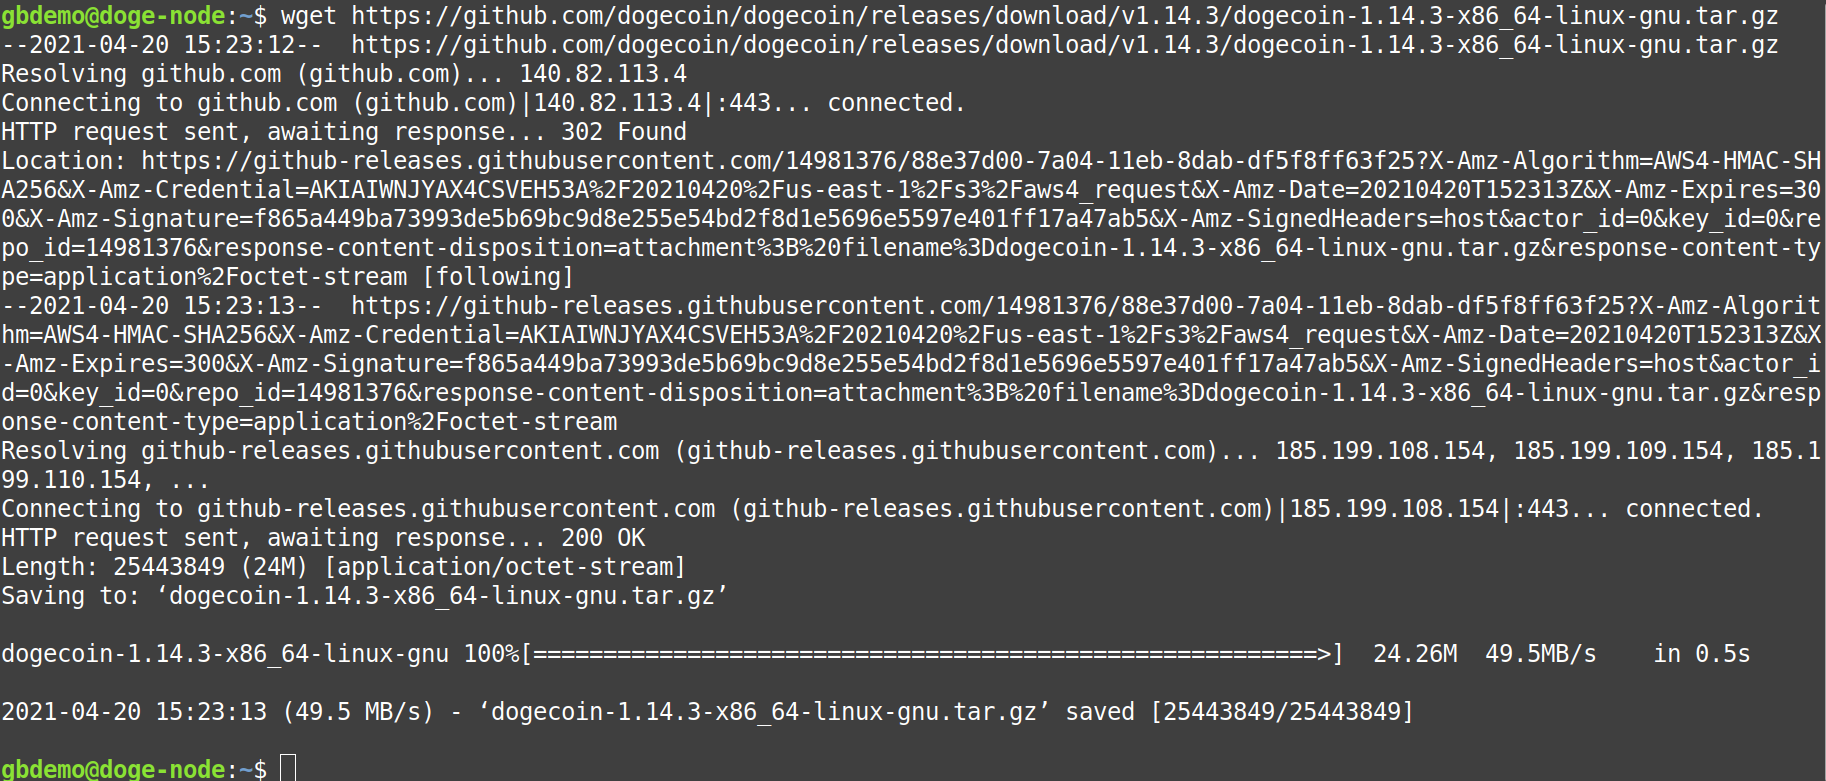
Download the latest gzipped tarball from DOGECoin Github Site:
In this example, version 1.14.3 is downloaded:
| Code Block |
|---|
wget https://github.com/dogecoin/dogecoin/releases/download/v1.14.3/dogecoin-1.14.3-x86_64-linux-gnu.tar.gz |
Unzip the tarball:
| Code Block |
|---|
tar xzf dogecoin-1.14.3-x86_64-linux-gnu.tar.gz |
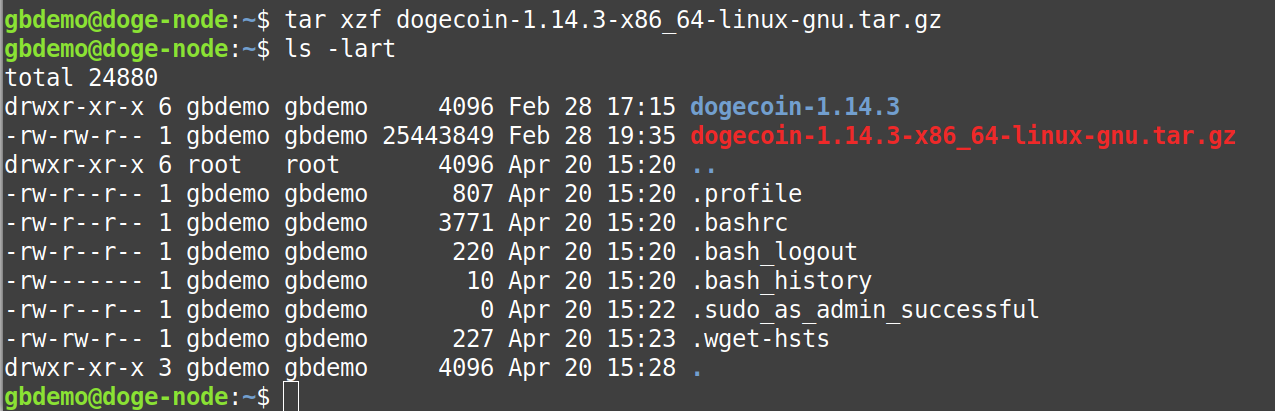
the tarball will be decompressed into the current directory (here: home directory)
Create an RPC token:
The RPC token is designed to eliminate the need for hard-coded passwords in configuration and script files. You will receive a password here ONCE.
| Tip |
|---|
This password is required for CAS - it's your “RPC Password” noted in Step 6. |
Download rpcauth.py on GitHub:
| Code Block |
|---|
sudo wget https://raw.githubusercontent.com/bitcoin/bitcoin/master/share/rpcauth/rpcauth.py -O /usr/local/bin/rpcauth.py |
Modify the file permissions to allow the python script to execute:
| Code Block |
|---|
sudo chmod +x /usr/local/bin/rpcauth.py |
Then finally run the RPC token generator that you just installed and enabled:
| Code Block |
|---|
rpcauth.py GBRocks |
Replace “GBRocks” with any preferred user name.
Don’t use spaces or any special symbols.
The user name is required for CAS - it's your “RPC User” noted in Step 6.
| Tip |
|---|
In this example, “GBRocks” is the user required in the parameter string. |
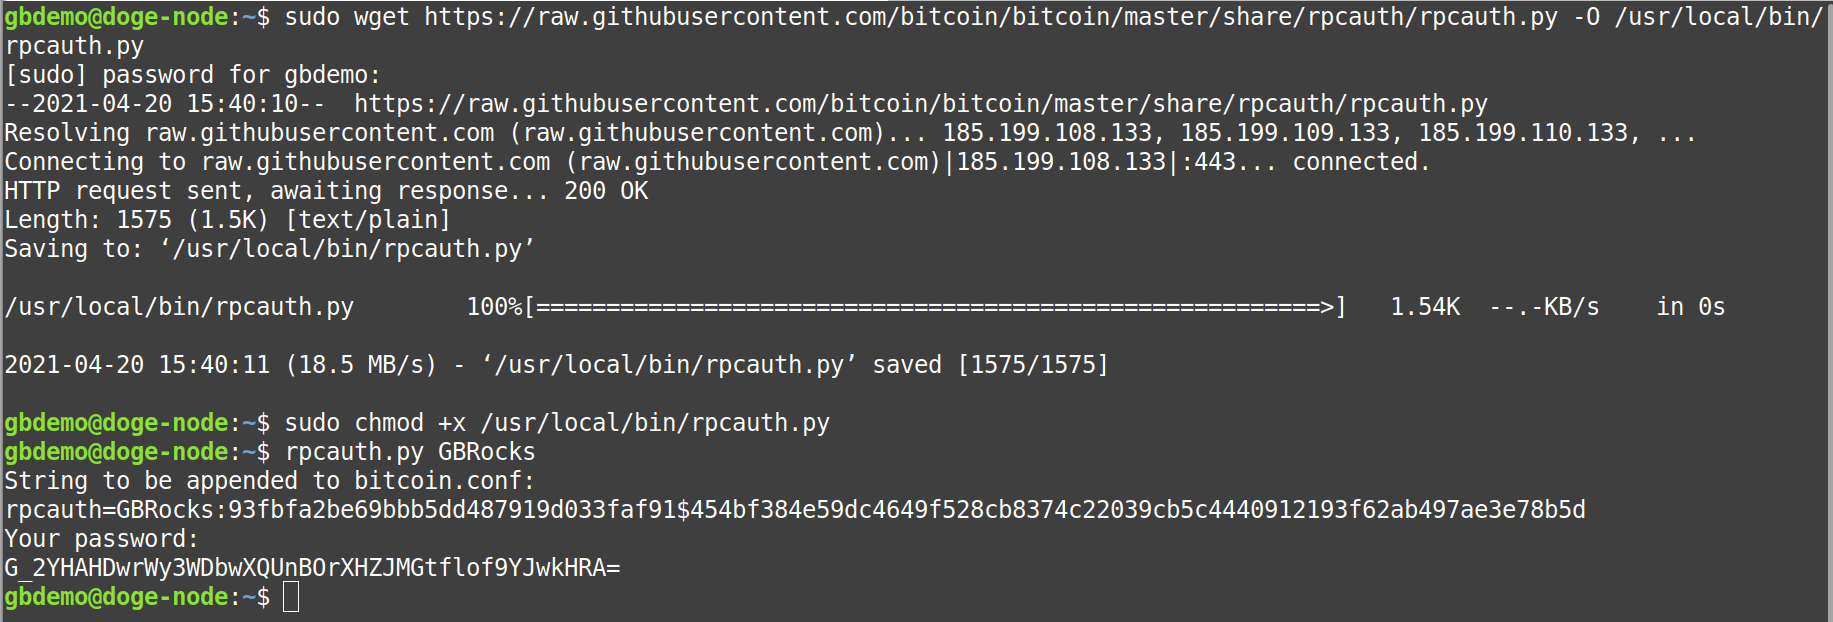
A complex password is generated for you, and will be required in your Crypto Settings parameters.
The password will only be offered to you ONCE. If you lose it, you’ll have to create a new cookie.
From this example, the node password will be:
G_2YHAHDwrWy3WDbwXQUnBOrXHZJMGtflof9YJwkHRA=While the script refers to Bitcoin, it’s actually general purpose. Ignore those references.
| Tip |
|---|
The password required in the parameter string is: |
Configure dogecoind for use with CAS:
Create the configuration file:
| Code Block |
|---|
mkdir .dogecoin touch .dogecoin/dogecoin.conf |

Add the required ingredients:
| Code Block |
|---|
nano .dogecoin/dogecoin.conf |
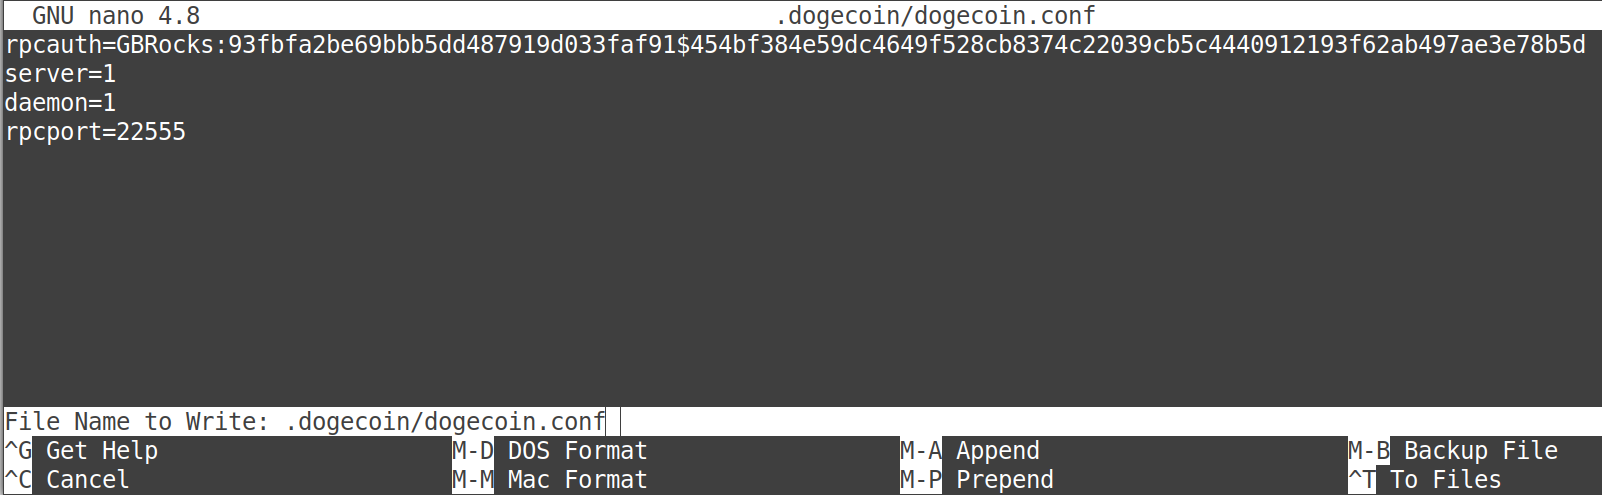
Insert the rpcauth cookie and other required settings:
| Code Block |
|---|
rpcauth=GBRocks:93fbfa2be69bbb5dd487919d033faf91$454bf384e59dc4649f528cb8374c22039cb5c4440912193f62ab497ae3e78b5d server=1 daemon=1 rpcport=22555 |
More information regarding the configuration settings can be found here: https://github.com/dogecoin/dogecoin/blob/master/contrib/debian/examples/dogecoin.conf
Press Ctrl+X (then Y) to exit & save the file (DO allow it to save, do NOT change the filename).
Optional: install the bootstrap blockchain
Started normally, the daemon will download and confirm the entire DOGE blockchain. This can be a VERY slow process, but it ensures the integrity of the blockchain. If you’re handicapped by impatience, you can download the “bootstrap” blockchain and skip much of the waiting.
There are a couple ways to go about this.
One is to locate a current tarball (usually a torrent) and overwrite the 2 relevant directories in the .dogecoin directory. This is the fastest method, but you’re on your own. No support. Much fast.
The other method is to download it from sochain.com (or other trusted sites). That method is the “official” method implemented by dogecoind, and is executed like this:
Download the boostrap to the data directory:
| Code Block |
|---|
wget https://bootstrap.sochain.com/bootstrap.dat -O ~/.dogecoin/bootstrap.dat |
As of publication of this article, the bootstrap is 12 GB (make sure you have the extra space).
When you start the daemon (in the next step) it will use this bootstrap instead of the slow method.
When the bootstrap has been completely imported (may take an hour or longer), the daemon will rename the file to:
bootstrap.dat.oldand you may safely delete it.
Start the daemon
| Code Block |
|---|
dogecoin-1.14.3/bin/dogecoind |
The daemon may now be controlled by the dogecoin-cli program. This command will list all the commands available to you from the command line, and verify that everything is working (so far):
| Code Block |
|---|
dogecoin-1.14.3/bin/dogecoin-cli help |
The blockchain will take some time to download & be confirmed on your node. We’re stuck here until this process finishes. It could take days (or longer)! So, we’ll install the GB Wallet Tunnel in the meantime.
| Tip |
|---|
To test if the blockchain is completely downloaded & up-to-date, use:
Compare the number returned with the number of “Blocks Count” from https://bitinfocharts.com/dogecoin/ When the 2 numbers are the same, the node is “synchronized” and functional.
|

Setup a secure tunnel for encrypted communication:
The GB Wallet Tunnel is recommended:
General Bytes has incorporated an open-source ssh client into CAS.
Click here for instructions to install the GB Wallet Tunnel Server.
Perfect for the GB Cloud CAS.
NOTE: to create a secure SSH tunnel between your CAS server and your node, use:
ssh -f -N -i /path/to/your/key -l <LOGIN_ID> -L 22555:127.0.0.1:22555 <NODE_IP>
This method is unusable with the GB Cloud, and provided for informational purposes only for those Operators with a Standalone CAS.
Prepare the parameters for the CAS Crypto Setting:

The protocol is currently always http.
The user and password were acquired from the rpcauth cookie previously generated.
The host is the PUBLIC IP of your node. Private IP’s WILL NOT WORK!
The default RPC port is: 22555
also specified in the dogecoin.conf file.
The accountname is the preferred wallet (if any). Leave blank to use the default wallet.
So, in this example, this is the required parameter string for my DOGE Crypto Setting:
http:GBRocks:G_2YHAHDwrWy3WDbwXQUnBOrXHZJMGtflof9YJwkHRA=:35.231.98.11:22555
(no “accountname” is specified in this example).
Save it!


Test it:
Re-enter the Crypto setting and run the Hot Wallet Buy test.
Green means good!
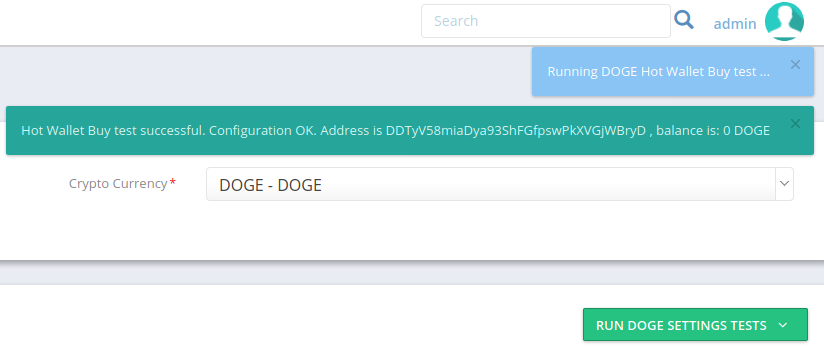
If you see red, check your parameters carefully.
Your node may still be unsynchronized.
The node won’t be useful (and the test will fail) until it catches up!