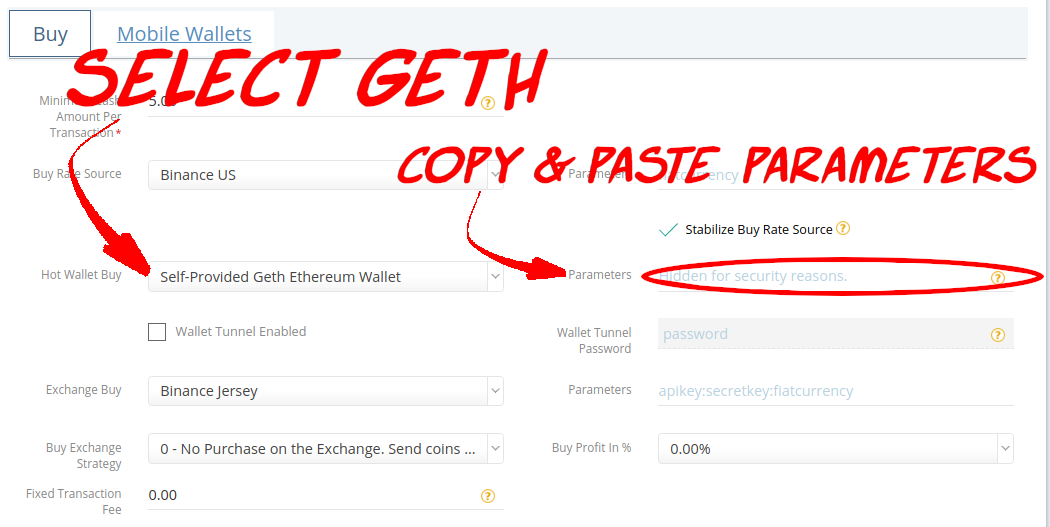
This is a step-by-step guide for adding Geth as a Hot Wallet Buy source.

The following example is based on the presumption that the Geth Ethereum node has been installed, configured, and tested for proper use.
This guide is intended to help you attach a working Geth Ethereum node to a functional CAS. |
/wiki/spaces/ESD/pages/1273888793
Even more information: Node Tutorial (Generic) |
1. Assemble the required information for CAS:

Parameters are host : port : username : password : cert_fingerprint : wallet_address : gas_limit
Parameter | Description | Examples |
|---|---|---|
host | IP of the Geth Ethereum node.
| 127.0.0.1 |
port | RPC port of the Geth Ethereum node
| 8545 |
username | deprecated - no longer required or used. | |
password | deprecated - no longer required or used. | |
cert_fingerprint | deprecated - no longer required or used. | |
wallet_address | this is the wallet implemented & unlocked on the node.
| 0x18f54a37626138b78c0ce05ca90e02cd45332cab |
gas_limitoptional | Sets the maximum gas amount (gwei) that can be spent on a single transaction. | 65 |
Understanding “host”:The “host” is where CAS will steer RPC communications: the target server. The server will vary upon your implementation, and the IP will vary depending upon your actual assigned IP for your node/server.
|
In this example, using the above, our "Parameters" looks like this (all one line):
127.0.0.1:8545::::0x18f54a37626138b78c0ce05ca90e02cd45332cab |
no spaces or special characters permitted (the tests will fail).
2. Select Geth & enter the Parameters:

copy & paste to avoid typing errors.
3. (optional) enable the GB Wallet Tunnel:

Enter the Wallet Tunnel Password provided during tunnel installation.
More information: Install the GB Wallet Tunnel Server
Do not enable the Tunnel if the GB Wallet Tunnel isn’t implemented!
4. Save the Crypto Setting!

5. Finally, test it out.
Select Test Hot Wallet Buy from the RUN BTC SETTINGS TEST.
Presuming everything was entered correctly, you should receive confirmation of success! |
You're done!
|
